
git-cliff: The Smart Way to Handle Changelogs
Join me exploring thejourney from the manual (tedious) task of creating changelogs to fully automated changelogs with git-cliff.
Developed in Rust, git-cliff leverages Conventional Commits and Semantic Versioning to produce human-readable, nice-looking, project histories directly from your git history. Dive into how git-cliff works, how to use it, and see it in action in a real-world project integrated with GitHub Actions.
Introduction
Some of us will remember those days (thankfully gone 🙂), when setting up a new software project felt like preparing for a space mission. Countless manual steps, clever tricks and work-arounds and constant ping-pong to coordinate versions and releases with other peers and no really good VCS. 💩
Fast-forward to 2024 — automated scripts and commands have replaced much of the tedious work, turning days of setup into minutes.
At the heart of this transformation is of course git. Like father, like son, perhaps its greatest merit is to have shifted the development paradigm from centralized control with systems like SVN, where every commit was basically also a push, to a decentralized workflow. And with git we gained not only more more freedom but also introduced a higher degree of responsibility in managing code branches and merges.

Around Git, a culture of best practices has flourished both to organize the work of potentially numerous teams and make integration easier for the users. Semantic Versioning and Conventional Commits, are just two tools that will be relevant here.
If you’re not yet familiar, here’s the gist: Semantic Versioning uses three numbers —
- Break something? Bump the major.
1.0.0 => 2.0.0 - Add a feature? That’s a minor update.
1.1.0 => 1.2.0 - Fixing bugs? Increment the patch.
1.1.0 => 1.1.1
Conventional Commits on the other side bring a standard structure to commit messages, making them not only more readable but also perfect for automation — and as devs we all love automation 😊.
They consist of one prefix, optionally a scope and the commit message:
feat(db!): drop customer table

fix(api): cast param A to String
Amidst all these advancements and best practices, there is one “guy” that remains sidelined: the changelog.
And still the changelog is more than a formality; a well-curated changelog is the historical narrative of your project. A git history all dressed up for a date, beautiful, human-redable and meticulously curated 💃 It clarifies what changed, why it matters, and how it affects users, ensuring that everyone stays informed.
That is also no surprise that many tools and platforms have their way of handling changelogs. Github’s UI offers some support within its ecosystem, but imagine having a tool that integrates seamlessly into your pipelines, no matters where you host your code, runs from the command line, and autonomously generates detailed changelogs.
Traditional methods like git shortlog or git reflog provide summaries but often skip the finer details or struggle
with
how they group and render commits. Other tools are available (cocogitto, jilu, git-journal, relnotes, etc…), but they
typically demand more manual effort than they justify.
And that’s why git-cliff — was such a delightful discovery for me, not least because it’s implemented in Rust (a
language
I have a soft spot for 🦀). Developed by Orhun Parmaksız, an ingenious open-source
contributor, git-cliff automates
changelog generation by parsing the git history. All it requires is a commitment to using conventional commits (and,
ideally, Semantic Versioning for best results).
With git-cliff, generating changelogs becomes enjoyable, whether you’re doing it manually via command line or as a
small step in your CI/CD pipeline.
Deep Dive into git-cliff
The idea of creating git cliff was born, like many other great tools, from a mix of inspiration and frustration, as its creator himself told in a talk.
Orhun, probably best known for the excellent work on Ratatui ( the de facto standard library for developing TUI in Rust), aimed to contribute to jilu, a tool for generating changelogs that was no longer maintained. After his pull request went unanswered, he decided to take matters into his own hands, and started working on git-cliff.
How git cliff works
Git cliff operates through three main components:
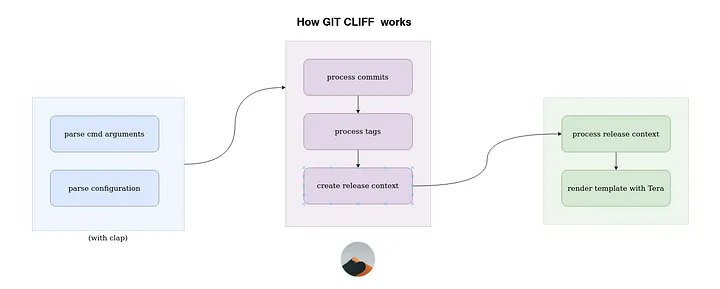
- Parsing Command Line Arguments: for thisgit-cliff utilizes the clap crate.
- Parsing Git History and Preparing the Context: The core functionality of git-cliff. It involves reading the git history to construct a contextual understanding of the project’s evolution. It uses the git2 Rust crate to interact with the git repository, gathering data about tags and commit messages. This data is then organized into a struct that categorizes commits according to Semantic Versioning and groups them by their Conventional Commit types, such as feat, fix, or chore. For the next releases git2 will be probably replaced by gitoxide, a Rust implementation of git, whereas git2 just offers bindings for the classic libgit2
- Rendering the Changelog: Once the context is prepared, git-cliff moves on to rendering the changelog. This is achieved through the tera templating engine, basically Jinja2 reimplemented in Rust. Tera allows for high customization of the output, through the cliff.toml file, which is the only configuration file you’d need to add to your repo in order to use git-cliff.
Let’s get our hands dirty
Enough theory and history — though fascinating! Now, let’s roll up our sleeves and dive into the practical side of things.
Install git-cliff
No matter if you’re a seasoned developer or just starting, installing git cliff is really easy. Either you download the binaries directly from the latest release on Gitub or you can build it from source — assuming you have rust installed — by just running:
cargo install git-cliff
Once installed, you can easily initialize git-cliff by cd in your project and running:
git cliff --init
This command creates a default cliff.toml configuration file in your repository. You can of course edit this file to tailor the changelog output to your project’s needs.
Run git cliff
So simple as typing:
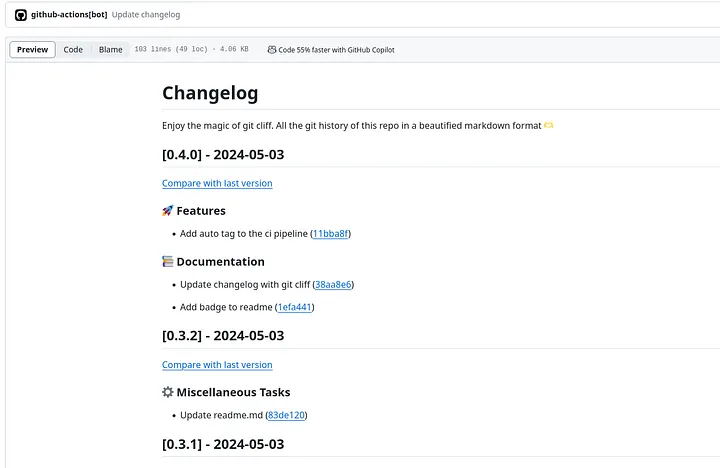
git cliff -o CHANGELOG.md
Et voilà we have a changelog. And to be honest, the -o flag is also optional, but allows you to set the name of the produced changelog markdown file.
Other useful flags can be found in the official docs and are one of the distinguishing features of git cliff in comparison to other tools, which do not support command line arguments.
Extra: Integrate git cliff with a Ktor Project
Since it took me an eternity to decide on a topic worthy of my first Medium article 🙈 — something that hasn’t been rehashed a thousand times — here’s a little extra for you: see git-cliff in action.
You can have a look at my repo with a PoC about how to integrate git cliff in a Kotlin project (the language I use every day at work). It was really easy to add an automated changelog with just minimal steps.
The contributors of git cliff have also created some practical github actions (a gitlab integration is available as well) that can be used to integrate git cliff into a ci/cd pipeline via gh actions. Here is my quick draft with the steps to build and test a Ktor project and then commit the changelog created via git cliff:
name: CI
on:
 workflow_dispatch:

jobs:
 build-and-publish:
   runs-on: ubuntu-22.04
   permissions:
     id-token: write
     contents: write
     actions: read
     checks: write
   steps:
     - name: "📥 Checkout repository"
       uses: actions/checkout@v4
       with:
         fetch-depth: 0

     - name: "🔧 Set up JDK 21"
       uses: actions/setup-java@v3
       with:
         java-version: 21
         distribution: 'corretto'

     - name: "🔧 Setup Gradle"
       uses: gradle/gradle-build-action@v2.4.2

     - name: "🔎 Run check & detekt"
       id: gradle
       run: |
         ./gradlew check --no-daemon --continue

     - name: "🔧 Generate a changelog"
       uses: orhun/git-cliff-action@v3
       with:
         config: cliff.toml
         args: --verbose
       env:
         OUTPUT: CHANGELOG.md
         GITHUB_REPO: ${{ github.repository }}

     - name: "📥 Commit the Changelog"
       run: |
         git config user.name 'github-actions[bot]'
         git config user.email 'github-actions[bot]@users.noreply.github.com'
         set +e
         git add CHANGELOG.md
         git commit -m "Update changelog"
         git push https://${{ secrets.GITHUB_TOKEN }}@github.com/${GITHUB_REPOSITORY}.git main
Conclusion
Thank you for reading! I hope this exploration of git-cliff was interesting for you as it was for me to have a look at it and inspires you to integrate this tool into your workflow.
Your feedback are more than welcome — share your thoughts! 😉